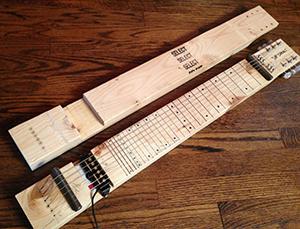
How to Build a 2×4 Lap Steel Guitar

Have you ever wanted to learn how to make your own lap steel guitar at home?
Here are the (oversimplified) basics of what you’ll need to do…mark down some lines, make cuts to the 2×4, and install some simple hardware. If you want to get down to the Nitty of Gritty of making a homemade Lap Steel Guitar…keep reading this post for details.
This tutorial is featured at GuitarWorld and is created by Shane Speal
Parts needed
- 32″ section of 2×4 pine lumber. (Note: Due to harmful chemicals, do not use pressure-treated lumber!)
- Two (2) 1/2″ diameter allthread rods, 3.5″ long (Allthread rods are like bolts without a head. You can find these at hardware stores. I found a box of them at a flea market).
- One pack of guitar, tuners, three-to-a-side
- Pre-wired acoustic soundhold pickup
- One pack of medium-gauge electric guitar strings.
Tools needed
- Electric drill + two drill bits: 3/32″ and 5/16″
- Table saw or circular saw
- Small screwdriver
Directions
1) Cut a standard pine 2×4 into a 32″ length

2) Cut out the headstock
Turn the 2×4 on its side and mark a vertical line 4″ from the left end
Mark a horizontal line 5/8″ from the top (as pictured). Cut away the bottom portion in the headstock area (shaded are in the picture). I used a dado blade on my table saw. You can also do the same thing by running the saw in multiple passes over the shaded area and then using a chisel to remove any extra wood chips.

03. Optional: I smoothed out the underside of the headstock on my belt sander. It also provided a little heel curve.
04. Drill tuner holes: Mark your tuner holes on the underside of the headstock. I went in about 5/8” in on each side and spaced the tuners about an inch apart. Use a 5/8” drill bit to drill the tuner holes.

05. Turn the 2×4 back over and the following marks on the board, starting from the butt end and going up toward the headstock:
a) 1.5” (this will be our through-body string feed)
b) 3” (bridge location)
c) 4.5” (pickup cavity)
d) 6” (pickup cavity)
e) 26” (nut location)
06. Cut out the pickup cavity: Notch out the wood between the 4 ½” and 6” line. Go about ¾” deep. Use the same dado technique as above with the headstock.

07. Drill the string feed holes. Use a 3/32 drill bit to drill six holes for the strings to feed through the body. Quite honestly, I eyeballed these holes. The rough measurements from left to right are: 3/4”, 1 1/8”, 1 ½”, 2”, 2 ½”, 2 ¾”

08. Mark your fret guides: Measure out the frets by starting at the 26” nut location and make pencil marks for each fret location. Then use a contractor’s square to draw the fret lines (I used a Sharpie for some quick and dirty fret lines. You also can paint or woodburn them if you want).

Fret markers*:
1 1.29”
2 2.50”
3 3.65”
4 4.74”
5 5.76”
6 6.73”
7 7.64”
8 8.51”
9 9.32”
10 10.0”
11 10.8”
12 11.5”
13 12.1”
14 12.7”
15 13.3”
16 13.8”
17 14.3”
18 14.8”
19 15.3”
20 15.7”
21 16.1”
22 16.5”
23 16.9”
24 17.2”
25 17.5”
26 17.8”
27 18.1”
28 18.4”
09. Optional: Carve grooves for bridge and nut. Use a wood rasp to notch grooves at the 3” mark and the 26” mark. These grooves will keep the allthread bolts from moving. (You can see these grooves in the picture at Step 13.)
10. Install the tuners and bushings at the headstock.

11. Install the pickup. Depending on the pickup you choose, installing could occur many different ways. As you can see, I just bent the cheap mounting tabs down on my pickup and shoved a couple screws into them to mount to the guitar. My pickup cavity was too deep, so I put a little bit of cardboard to raise it up. Ideally, you want the pickup to rest approx. ¼” away from the strings.

12. String up the lap steel, but leave the strings slackened. If the strings start to pull through the soft pine wood, place a small nail through the ball loop of the string to keep it anchored.
13. Carefully wedge the allthread bolts into the 3” and 26” marks. These will act as your nut and bridge.

14. Space the strings evenly over the pickup, using the threads on the nut and bridge bolts as your string slots.
15. Tune the guitar. Try an open D chord to start (D, A, D, F#, A, D, low to high).
16. Optional: If the strings keep pulling out of the threads on the nut, use simple roundhead wood screws to act as string trees. Add slack to the offending string, position the screw beside the string (so the screw head holds the string down) and insert it just deep enough to provide tension on the string.

17. Crank it up! Use your choice of slide or just grab a beer bottle and go. In the video above, I’m using a deep well socket!
NOTES: If you can’t find allthread rods to serve as bridge and nut, try other bolts, pipe pieces with notches cut into them or sections of ham bones.
The Stewart MacDonald fret calculator was used for these measurements and have been rounded off to the nearest hundreth.
Check out Shane Speal Guitar for more great guitar resources.


0 Comments